ML/AI
Blue/Green Screen Effect using OpenCV and Color Threshold
Ever wondered how the magic CGI images are generated in movies and advert posters. The trick they use is a blue or green screen backgound and later replace the background with the desired background image.
Blue Screen special effects using OpenCV and Color Threshold
To change the background of an image with a blue/green screen using computer vision libraries such as OpenCV, you can follow these general steps:
- Read the input image with the blue/green screen background.
- Convert the image to the RGB or HSV color space to easily segment the blue/green screen.
- Create a mask to identify the blue/green screen area.
- Replace the blue/green screen area with a new background image.
Here's a detailed implementation in Python using OpenCV with an image having both blue and green background as place holders, we will thne fill that space with desired background images.
We will replace the blue area using the RGB coor space threshold and the green area using the HSV color space threshold.
Step-by-Step Implementation
import matplotlib.pyplot as plt
import numpy as np
import cv2

%matplotlib inline
Read in and display the image
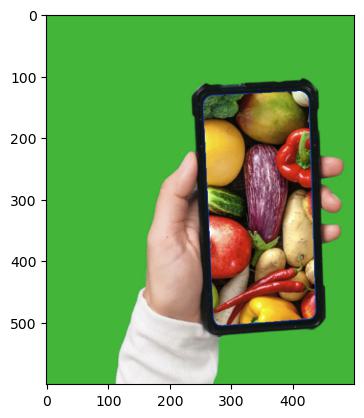
# Read in the image
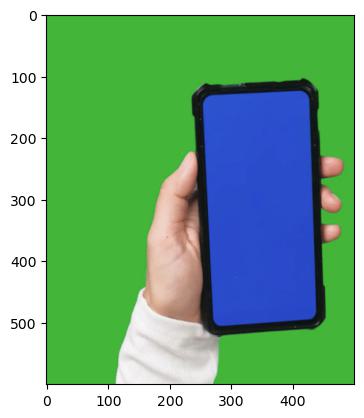
image = cv2.imread('lab/images/blue-green-screen-hand..jpg')
# Print out the type of image data and its dimensions (height, width, and color)
print('This image is:', type(image),
' with dimensions:', image.shape)
This image is: <class 'numpy.ndarray'> with dimensions: (600, 500, 3)
# Make a copy of the image
image_copy = np.copy(image)

# Change color to RGB (from BGR)
image_copy = cv2.cvtColor(image_copy, cv2.COLOR_BGR2RGB)

# Display the image copy
plt.imshow(image_copy)
<matplotlib.image.AxesImage at 0x13efb9790>
Define the color threshold
## TODO: Define the color selection boundaries in RGB values
# play around with these values until you isolate the blue background
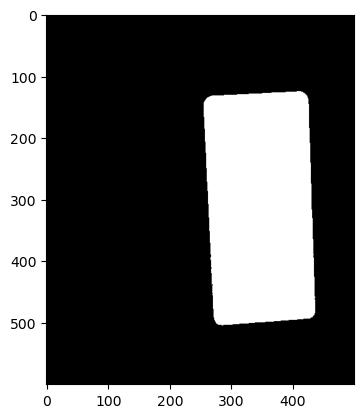
lower_blue = np.array([0,0,190])
upper_blue = np.array([190,195,255])
Create a mask
# Define the masked area
mask = cv2.inRange(image_copy, lower_blue, upper_blue)

# Vizualize the mask
plt.imshow(mask, cmap='gray')
<matplotlib.image.AxesImage at 0x13f0250d0>
# Mask the image to let the pizza show through
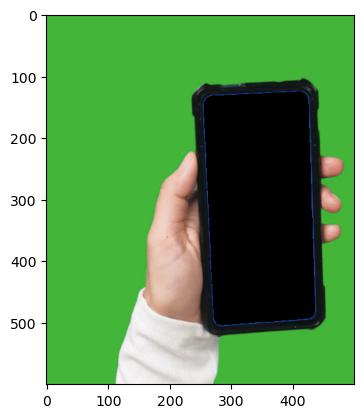
masked_image = np.copy(image_copy)
masked_image[mask != 0] = [0, 0, 0]
# Display it!
plt.imshow(masked_image)
<matplotlib.image.AxesImage at 0x13f0818d0>
Mask and add a background image
# Load in a background image, and convert it to RGB
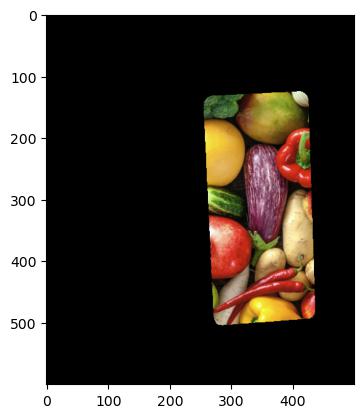
background_image = cv2.imread('lab/images/food-Background.jpg')
background_image = cv2.cvtColor(background_image, cv2.COLOR_BGR2RGB)
# Crop it to the right size (600*500)
crop_background = background_image[0:600, 0:500]
# Mask the cropped background so that the pizza area is blocked
crop_background[mask == 0] = [0, 0, 0]
# Display the background
plt.imshow(crop_background)
<matplotlib.image.AxesImage at 0x13f1b6790>
Create a complete image
# Add the two images together to create a complete image!
first_stage_image = masked_image + crop_background

# Display the result
plt.imshow(first_stage_image)
<matplotlib.image.AxesImage at 0x13f2802d0>
Define the color threshold for green channel
## TODO: Define our color selection boundaries in RGB values
lower_green = np.array([0,170,0])
upper_green = np.array([170,255,170])
Create a mask
# Define the masked area
mask = cv2.inRange(image, lower_green, upper_green)

# Vizualize the mask
plt.imshow(mask, cmap='gray')
<matplotlib.image.AxesImage at 0x13f3b51d0>

Mask and add a background image
import matplotlib.image as mpimg
# Load in a background image, and convert it to RGB
background_image = mpimg.imread('lab/images/space-background.jpg')

## TODO: Crop it or resize the background to be the right size (450x660)

## TODO: Mask the cropped background so that the pizza area is blocked
# Hint mask the opposite area of the previous image

## TODO: Display the background and make sure