

ML/AI, CV
What is computer vision
Computer vision is a field of artificial intelligence (AI) that essentially gives computers the ability to see and understand the world around them. Just like humans use their eyes and brain to take in visual information and make sense of it, computer vision uses cameras and algorithms to do the same thing.
Why Computer Vision?
The goal of computer vision is to replicate the complex and powerful capabilities of human vision by acquiring, processing, analyzing, and understanding images and, in general, high-dimensional data from the real world in order to produce numerical or symbolic information.
Computer vision leverages various techniques, including machine learning (ML), deep learning, and neural networks, particularly convolutional neural networks (CNNs), to achieve these tasks with high accuracy and efficiency.
Applications of computer vision
Medical Imaging: Analyzing medical images to assist in diagnosis and treatment planning.
Autonomous Vehicles: Enabling self-driving cars to perceive and navigate their environment.
Surveillance: Monitoring and analyzing security footage.
Augmented Reality (AR): Integrating digital information with the user's environment in real time.
Facial Recognition: Identifying and verifying individuals from facial images.
Industrial Automation: Inspecting products and processes in manufacturing.
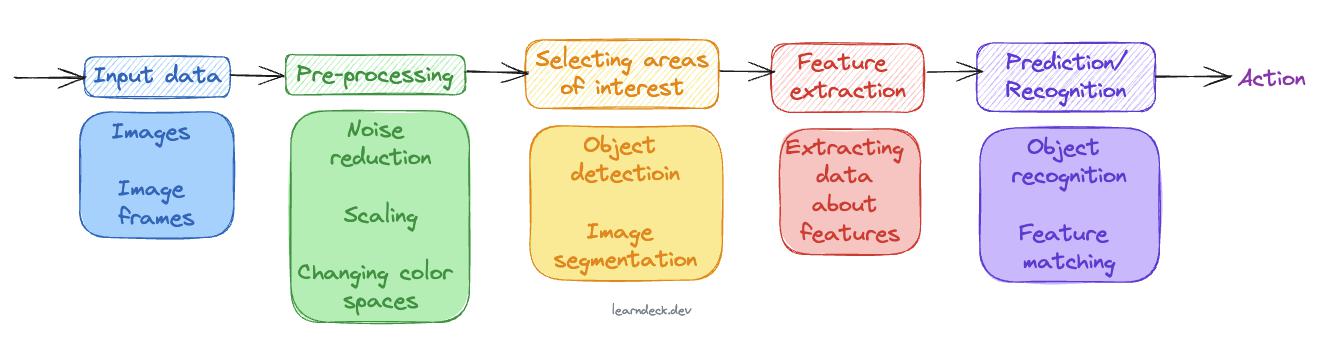
Computer Vision Pipeline
A computer vision pipeline consists of several stages, each focusing on a specific aspect of processing and analyzing visual data. The stages can vary depending on the specific application, but a typical computer vision pipeline includes the following steps:
Try it on a Raspberry Pi
Computer vision is one of the few areas where a Raspberry Pi is genuinely the right tool rather than a compromise: a camera, a few watts, and something pointed at the real world. Everything in the pipeline above is small enough to run on one, provided you are honest about which stage costs what.
   ┌────────────────────────────┐
   │ Camera Module              │  1920x1080 @ 30 fps
   └──────────────┬─────────────┘
                  │ picamera2
                  ▼
   ┌────────────────────────────┐
   │ Capture a frame            │  downscale HERE, not later:
   │ as a numpy array           │  640x480 is 9x less work
   └──────────────┬─────────────┘
                  ▼
   ┌────────────────────────────┐
   │ Preprocess                 │  greyscale, blur, resize
   └──────────────┬─────────────┘
                  ▼
   ┌────────────────────────────┐
   │ DETECT - pick your cost    │
   │  ┌──────────────────────┐  │
   │  │ frame differencing   │  │  cheap  ┐
   │  ├──────────────────────┤  │         │
   │  │ Haar cascade         │  │         ├── all of these
   │  ├──────────────────────┤  │         │   run on the CPU
   │  │ TFLite / MobileNet   │  │  heavy  ┘
   │  ├──────────────────────┤  │
   │  │ Hailo AI HAT+        │  │  offloaded to silicon
   │  └──────────────────────┘  │
   └──────────────┬─────────────┘
                  ▼
   ┌────────────────────────────┐
   │ Act                        │  draw / log / GPIO / alert
   └────────────────────────────┘
The single most important habit is in the second box. Capture at the resolution you intend to process, not at the camera's maximum - going from 1920x1080 to 640x480 is nine times less data through every stage that follows, and for most tasks it changes nothing about the result.
What you need
- A Pi 4 or Pi 5, and a camera. Camera Module 3 autofocuses, which matters more than you would think; the older v2 is fine and cheaper. The HQ camera takes proper lenses.
- Pi 5 owners: the camera connector changed. A Pi 5 uses the narrower connector, so a camera that came with a Pi 4 ribbon needs the mini-to-standard adapter cable. This catches almost everyone once.
- Decent lighting. Time spent on a lamp beats time spent tuning thresholds, every time.
Set up
sudo apt update
sudo apt install -y python3-picamera2 python3-opencv

# Check the camera works before writing any code
rpicam-hello -t 5000
Install both from apt rather than pip. picamera2 is packaged as a system module, and opencv from pip may try to compile itself on the Pi, which is an experience you can skip.
If you insist on a virtual environment, it must be able to see those system packages:
python3 -m venv --system-site-packages ~/cv-venv
source ~/cv-venv/bin/activate
A plain python3 -m venv produces ModuleNotFoundError: No module named 'picamera2', and it is not obvious why.
Project 1: Motion detection
The cheapest useful thing in computer vision, and it needs no machine learning at all. Compare each frame to the last one; anything that changed is movement.
from picamera2 import Picamera2
import cv2

picam = Picamera2()
picam.configure(picam.create_video_configuration(
    main={"size": (640, 480), "format": "RGB888"}))
picam.start()

previous = None

while True:
    frame = picam.capture_array()
    grey = cv2.cvtColor(frame, cv2.COLOR_BGR2GRAY)
    grey = cv2.GaussianBlur(grey, (21, 21), 0)

    if previous is None:      # first frame, nothing to diff
        previous = grey
        continue

    delta = cv2.absdiff(previous, grey)
    mask = cv2.threshold(delta, 25, 255, cv2.THRESH_BINARY)[1]
    mask = cv2.dilate(mask, None, iterations=2)

    contours, _ = cv2.findContours(
        mask, cv2.RETR_EXTERNAL, cv2.CHAIN_APPROX_SIMPLE)

    for c in contours:
        if cv2.contourArea(c) < 500:   # ignore noise/insects
            continue
        x, y, w, h = cv2.boundingRect(c)
        cv2.rectangle(frame, (x, y),
                      (x + w, y + h), (0, 255, 0), 2)

    previous = grey
    cv2.imshow("motion", frame)
    if cv2.waitKey(1) == ord("q"):
        break
Every line maps onto the pipeline: blur suppresses sensor noise so it does not register as motion, the threshold turns a difference image into a yes/no mask, and the contour area check is the difference between a useful detector and one that fires every time a cloud moves.
Swap cv2.rectangle for a photo, a log line or a GPIO pin and you have a security camera.
Project 2: Face detection
One step up, still no neural network. Haar cascades ship inside OpenCV and run acceptably on a Pi.
from picamera2 import Picamera2
import cv2

cascade = cv2.CascadeClassifier(
    cv2.data.haarcascades
    + "haarcascade_frontalface_default.xml")

picam = Picamera2()
picam.configure(picam.create_video_configuration(
    main={"size": (640, 480), "format": "RGB888"}))
picam.start()

while True:
    frame = picam.capture_array()
    grey = cv2.cvtColor(frame, cv2.COLOR_BGR2GRAY)

    faces = cascade.detectMultiScale(
        grey, scaleFactor=1.1, minNeighbors=5,
        minSize=(60, 60))

    for (x, y, w, h) in faces:
        cv2.rectangle(frame, (x, y),
                      (x + w, y + h), (255, 0, 0), 2)

    cv2.imshow("faces", frame)
    if cv2.waitKey(1) == ord("q"):
        break
minSize is the performance dial that matters: telling the detector to ignore anything smaller than 60x60 pixels removes a large chunk of the search space. Note the limits too - Haar cascades want a face looking straight at the camera, and they degrade badly with rotation or poor lighting. That is a fair illustration of why the field moved to CNNs.
Project 3: Real object detection
The two projects above are classical computer vision - handwritten rules over pixels. To detect what something is rather than that it moved, you need a trained model, and this is where a Pi's CPU starts to struggle: a MobileNet-class detector runs at a couple of frames per second.
Two ways forward:
- Accept the frame rate. For a bird feeder camera or a parcel detector, 2 fps is completely adequate. Run a TFLite model on the CPU and move on.
- Add an accelerator. The Raspberry Pi AI Kit / AI HAT+ pairs a Pi 5 with a Hailo NPU and moves inference off the CPU entirely, taking a YOLO-class model to real-time speeds. Once the packages are installed, the camera stack can run detection as a post-processing stage:
sudo apt install -y hailo-all
sudo reboot

cd /usr/share/rpi-camera-assets
rpicam-hello -t 0 \
  --post-process-file hailo_yolov6_inference.json
Check the current asset filenames on your own install - they move between releases.
What performance to expect
Rough figures at 640x480 on a Pi 5. Measure your own, and note how far apart the tiers are:
| Approach | Frames/sec | Good for |
|---|---|---|
| Frame differencing | 30+ (camera-limited) | Motion, presence, tripwires |
| Haar cascade | ~10-15 | Faces, close range, decent light |
| TFLite MobileNet on CPU | ~2-5 | "What is it?" when latency does not matter |
| Hailo NPU | ~30 | Real-time detection and tracking |
Gotchas
cv2.imshowneeds a screen. Over SSH to a headless Pi it will fail. Write frames to disk withcv2.imwrite, or stream them, and drop thewaitKeyloop.- Colour channels look swapped. picamera2's format naming does not match OpenCV's channel order intuitively. If your reds and blues are inverted, that is why - fix it with
cv2.cvtColorrather than by guessing. - The old
picameralibrary is dead. Anything on the internet usingimport picamerapredates current Raspberry Pi OS. You wantpicamera2. - Sustained CV will thermally throttle a Pi. All four cores flat out for an hour needs a heatsink or fan.
- Lighting beats algorithms. Most "the detector is bad" problems are actually exposure problems. Fix the scene before you tune the code.